Another Dungeon Keeper map Editor Manual v1.1
Created by ADiKtEd authors
Contents
Contents
4.1 UnDed and early ADiKtEd maps
4.2 Bad items count when loading "MAPFILE"
4.3 Cannot open file when loading "MAPFILE"
4.4 Thing has wrong sensitive tile number at slab X,Y
4.5 Thing trapped in solid column on slab X,Y
4.7 Problems in column or DAT file
5.0 ADiKtEd Configuration file
5.1 UnDed and Official Editor compatibility
5.2 FILL_REINFORCED_CORNER option
1.0 Preface
ADiKtEd is a text mode tool, which makes it a little harder to use at first. But after You'll get familiar with all functions, you will see that using keyboard in text mode is in fact faster than editing map with mouse in graphic-based editor.
Please note that this documentation was last renewed on version 0.80b, and if you're using different version, there may be differences in commands and view. You can always download the newest version from ADiKtEd project at SourceForge.
1.0 Installation

Make sure you have Dungeon Keeper installed completely on your hard disk. To do this, go into the "keeper" directory, and create the directories "ldata" and "levels".
Copy x:\keeper\ldata\*.* and x:\keeper\levels\*.* into these directories respectively (replacing x: with the drive letter of your CD-Rom). Then remove Read-only attribute from all copied files.
Now edit Keeper.cfg so it points to your installation. For example,
INSTALL_PATH=C:\Program Files\Bullfrog\Keeper
or
INSTALL_PATH=C:\games\keeper
On any problems, check the instructions in Mapmakers Installation Instructions which accompanies this manual.
When all maps are on hard drive, go into the directory containing map.* (which is ADiKtEd), and edit map.ini. Change the "LEVELS_PATH" line so it points to your new "levels" directory. This will enable you to load the original maps if you start ADiKtEd with a level number (eg "map 15" will load level 15 if you have set things up correctly).
You are now ready to run the editor. Go into its directory and double click on map.exe to start.
Another way to run it is to open console window, go into ADiKtEd directory and type map.
Note: Mouse is not supported in ADiKtEd. All commands must be entered using keyboard.
3.0 Quick start
This tutorial will guide you through creating a new level.
3.1 Getting started
Start up ADiKtEd by double click on map.exe, or typing "map" then enter in console window.
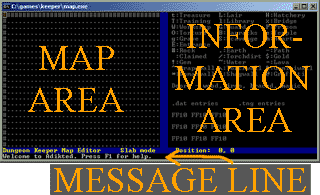
If all is well, a screen will come up with two blue lines, one down the middle, and one along the bottom, dividing the screen into three areas: the map area (the left side of the screen), the information area (the right side of the screen), and the message line (at the bottom).
The message line should have a welcome message on it.
The left side of the screen should have dark grey # characters
on the top and left, and dots elsewhere.
By looking at the key in the information area, you should
be able to see that this means there is rock to the top and left,
and earth elsewhere. In fact, there is rock all round the dungeon -
it's just you can only see the top left corner of the dungeon to
start with.
The very top left corner of the screen should be highlighted. This is your cursor. The next section will tell you how you can move around with it.
3.2 Movement and window size
Movement
As you may have guessed (or tried already), using the arrow keys moves the cursor around. However, if you want to go a long way, this can take a long time. Use home/end/page up/page down to move faster. On some operating systems, pressing ctrl with any movement key will make it go further too.
Note: You can see exactly where you are with the "Position" indicator on the dividing line at the bottom.
Window size
When the cursor reaches the edge of the map area, moving it further will scroll the map. Try moving around until you've seen the whole border. The furthest you can go in each direction is 84, so the bottom right hand corner of the map is 84,84.
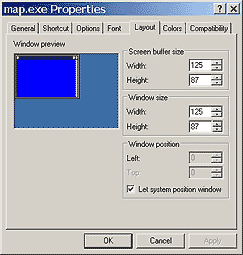
On some lame operating systems, you can't resize the ADiKtEd window to see more of the map tiles. If you're using Ms Windows, and you wish ADiKtEd window to be bigger, click on the icon on its window title bar and press "Properties". Now go to the "Layout" tab, as shown on the image. If you think your screen is big enough to let you see the whole map, enter the window size: Width=125, Height=87. Make sure that "Screen buffer size" values are identical to those in "Window size", then press OK, and confirm that you want to modify the shortcut to keep the new size every time you run ADiKtEd. If there is not enough space, but you want to view the whole map anyway, you can switch to "Font" tab of the "Properties" window, and select font size "6x8".
3.3 Placing tiles
The dungeon is pretty boring at the moment, right? Time to do something about that. Find a nice spot somewhere easy to find (near the top left corner, for instance) - but not right on the edge. As a rule, don't get rid of the rock on the edge. I'm not saying anything will go wrong, but it might - I don't know how Dungeon Keeper reacts at the edges.
Press t for treasure room, and sure enough a t will appear on the map, under your cursor.
Now if you move away from it, you'll see it's grey on a black background. That means it's not owned by anyone. Move back onto it, and press 0. Now when you move away, you'll see it's white on a red background. This means that it belongs to player 0 - the human player. There are 5 players - players 0-3 are the Dungeon Keepers, player 4 is the Lord of the Land (spit). Pressing the number of a player sets that square to be theirs.
Note that you can't make anyone own rock or earth - they are always unclaimed. If you will claim them, they will return to unclaimed state on saving or updating dungeon. They are a darker grey than other tiles to remind you of this. This means you should place something before you own it. Pressing 5 also "unclaims" something. If you move back over the t, and press 5, then move away, it will have gone back to being grey on black.
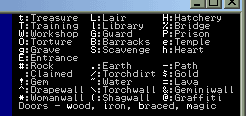
The information area should give you an idea of what to press to
get specific tiles... basically you press the key it shows you!
There is one exception to this, which is graffiti. We'll come onto
that later.
If you don't like pressing keys to place rooms, you can also press the Enter
key - this will show you a list where you can select any room using arrow keys.
Create a few small rooms, and put walls round them. Leave a path of claimed land (spaces) to get from room to room though! It's often easiest to create the rooms themselves first, then say who owns them later.
3.4 Marking
If you created any large rooms, you may have found it fairly timeconsuming. There must be a quicker way... it's a pretty big map, after all! Well, of course, having said that, there's bound to be. It's called marking, and you do it like this:
- Find a spare bit of earth where you might want to create a big room... a large lair maybe.
- Press ctrl+space. On the dividing line, it should tell you that you're now marking, and on the message line it will say, "Mark mode on".
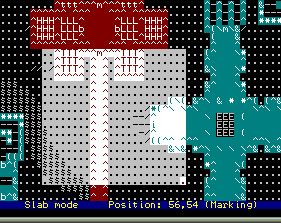
- Move around a bit... a white rectangle should appear between the cursor and where you first pressed ctrl+space.
- Mark out a nice big area... you want your creatures to have lots of room, don't you?
- Press L, and the white rectangle should be replaced by a lots of lair tiles.
If you've put the new lair over earth, it will be unowned... you need to set the ownership on the whole lot. Again, you can use mark mode.
- Press ctrl+space to enter Mark mode.
- Move around so the rectangle covers the whole lair, and press 0. Surprise surprise, the lair should now be white on a red background.
Tip: If you ever start marking then want to stop, press ctrl+space again.
Tip: You can save lots of time by laying out a lot of dungeon, then marking the whole area to be owned by a player. The ownership of rocks or earth will be reverted when saving, so don't worry!
3.5 Painting
Now, to make your creatures nice and safe, you may want a wall round the lair. You could mark out a long thin rectangle for each wall, but that would be a bit of a pain - you need to do each one twice, remember - once for the wall, once for the ownership. What you could really do with is being able to just move the cursor around, leaving a trail of walls behind...
- Move to the edge of the lair, where you want to start laying a wall.
- Press z. On the dividing line and message lines, there will now be indications that you're painting. Try moving around...
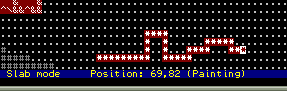
- Nothing's happening! Don't worry, this isn't a bug... you haven't told the editor what you want to paint with. Move back to where you want to start laying the wall, and we'll try again.
- Press *, and start moving around again. Lo and behold, a trail of walls will be left.
- "What about ownership?" I hear you cry. Good point. The walls you're laying at the moment are unowned - not a good state of affairs. So press 0 and try moving around again.
- Made the wall? Good stuff... now you want to put down the paintbrush. Press z again, and you'll stop painting.
"What if I want to change walls during painting?"
No problem.
Just press a different key - you can paint with any of the normal
tiles, and any of the ownerships. You can also press f to
paint random fortified wall - this will try to use different wall
every time you move. Try painting a corridor from the
lair to the rest of your dungeon.
Note: Pressing home/end/page up/page down, or ctrl and the arrow keys in paint mode won't lay a trail, as the cursor just jumpsfrom one place to another.
Create a few more rooms, until you're fairly happy with your dungeon layout.
3.6 Things
Now, everyone knows there's more to Dungeon Keeper than rooms.
What about creatures, gold, spells, torches, etc?
Well, it's time to introduce you to "thing mode".
Press tab.
The background colours will have stayed the same, but just about everything else will have changed. Slabs will be simplified and only show # and ., but other characters, as r and 1s will appear. The key on the right will have changed, and a rectangle will have appeared under the ".tng entries" section in the information area.
Explanation time: where there are numbers or letters, there are "things". "Things" are objects of various different natures: spell books, creatures, gold, dry ice effects, traps - a whole lot of stuff. You can find out the details of these by moving over them.
If there aren't any numbers or letters on the screen, press tab again to go back to slab mode. Draw out a big training room (and own it), then press tab to go back into thing mode.
Move over a square with a number on, and have a look at the information area.
In the ".tng entries" section there will be a short word somewhere. If you're on the training room, it will probably say "Trinr". You want to highlight that. If it's already within the white rectangle, you've got it already and there will be a whole load of other information. Either way, you need to learn how to move the highlighter around.
Make sure num-lock is on. Now use the number pad 1-9. You will see the rectangle will move to the place corresponding to the key you press. Have a play around for a minute, then highlight the word you see there.
There should be some information in the top half of the information panel. You can ignore the three lines of hex digits at the top - they're for detailed hackery, and probably won't concern you. Similarly, the position information may not interest you, but the rest should come in handy. You'll be able to see what kind of object you're looking at, and any other useful stuff about it. Different objects can be altered in different ways:
- Doors: go back into slab mode (with tab), and place a door. Come back into thing mode, and take a look. It should tell you what type of door you placed, and that's it's unlocked. Press l to lock it - pressing l again will unlock it.
- Creatures: Stay on the door you've just created, and press c. A list of creatures will come up. Select one of them, then press return. A short name for the creature will come up in the highlighted spot, and the information will change. Also, there'll be a couple of numbers in brackets just below the highlighter. That shows which thing you're looking at on that subtile (each tile has nine subtiles), and how many things there are there. Press / to change back to the door, and you'll see that's thing no. 1 (assuming there was nothing there beforehand).
- Press / again to cycle through to the creature again. You can now change the creature's level by pressing s and x. Try it.
- Dungeon specials: change the position of the highlighter to any empty spot (just for convenience) and press d. A "reveal map" dungeon special will come up. Press s and x to change which dungeon special the thing is.
- Spell books: Press b to create a spellbook. The first one will be the Hand of Evil spell. Press s and x to change to a different spell.
- Gold: Press g to create a pot of gold worth 500, or G to create one worth only 250. You can also use s and x to change the value.
- Traps: Press t to create a trap. Again, press s and x to change the trap type.
- Trap boxes: Press T to create a trap box (to be picked up by your imps). Use s and x to change the type.
- Hero gate: Press H to create a hero gate.
- Dungeon heart: If you will create a 3x3 heart room in "Slab mode", the "dungeon heart thing" will be placed automatically at center. If you wish to make a smaller heart pedestal, or place it in some specific place of large pedestal, you can use h in thing mode to place dungeon heart.
- Action points: Action points are used by the level script. Press a to add an action point - the information panel will tell you which number it is, for use when you write your level script.
"Aargh! Now I've got loads of things all over the place!"
Right. You want to delete them, don't you? Well, move over a square with a
thing in, highlight it and press delete. Hey presto, it vanishes.
Get rid of all the things you've created so far.
Press tab to get out of thing mode.
3.7 Updating level elements
Pressing u will update the graphic (if in Slab mode) or things (if in Thing mode) of the level - this makes sure every slab looks like it should, or that all the training posts, torturers, torches etc are in the right place.
Don't worry about it too much - ADiKtEd does an automatic update when you're changing the level. But if you see some graphic errors, or the Official Editor acts strangely, you can update the level to make everything work right. The automatic update may be disabled to speed-up ADiKtEd - in this case you should update the map before saving.
3.8 Graffiti
Now onto a special feature of ADiKtEd - graffiti. Fancy writing a message on a wall? Dead easy.
- In slab mode, press d to draw some graffiti. Go on, press it now.
- You'll be asked to type in a message. Type in a pithy epigram... or failing that, any old nonsense. Press return at the end.
- Eye-catching, isn't it? Yes, the purple @ signs mean graffiti. When you're over graffiti, the information area says what it is.
- You can always remove graffiti by pressing delete.
Note: Single graffiti is visible only from one side of the tile, for example if it has WE (west-east) orientation, it will only be visible from south. To see the text from both sides, you have to create two graffiti items with oposite orientation (like WE and EW).
You can change graffiti orientation with a. The graffiti is quite a nice effect, but I'd recommend using it sparingly.
3.9 Loading and saving
You know how to use ADiKtEd to edit levels now. Create a small level (you really only need a Dungeon Heart, and maybe try another room).
Finished already? That was quick...
- Press ctrl+s to save your
level. ADiKtEd will ask you for a filename.
I recommend saving it in a temporary file first - I usually use newmap - rather than saving straight over the original DK files to start with. If there's anything wrong with the dungeon, such as the human player not having a dungeon heart, ADiKtEd will warn you with a beep and a message, but still save the level. - Press ctrl+q to quit.
If you want to edit the level again, type:
map newmap
(replacing "newmap" with whatever you called your level).
Your level should appear in all its glory.
Edit it until you're happy. Save and quit again.
Now copy your level files over to the levels directory, with a
command like this:
copy newmap.* c:\games\keeper\levels\map00001.*
I recommend using level 1, as it's easy to get to.
Fire up Dungeon Keeper, and you're ready to go... press Start New Game (if you copied it over level 1) and see what happens. It may well instantly say you've won the game - that's 'cos you haven't changed the level script. The script would require a different tutorial... it doesn't really matter as far as ADiKtEd is concerned though. To learn about the script, check Dungeon Keeper Script Commands Reference.
You're now ready to go back and design a proper level to fox all your friends. Remember, you can press F1 at (almost!) any time in ADiKtEd and get help for whichever mode you're in. Inside the help, you will find many options that are not mentioned in this tutorial - don't forget to check it. Good luck, and I hope you enjoy using ADiKtEd!
Tip: Use ctrl+l to load a level within ADiKtEd, and ctrl+n to start a new level.
Tip: Use ctrl+r to automatically generate a level background.
4.0 Fixing maps
In this chapter you will learn what to do if a warning is generated when saving map, or if there is a problem during map verification.
4.1 UnDed and early ADiKtEd maps
Map which were made using UnDed, or early version of ADiKtEd, have many values incorrectly set, which may lead to various problems during the game. ADiKtEd tries to check all properties of things, slabs and other map elements for sanity. If a possible problem is found, a warning message is displayed in ADiKtEd.
Still, not all of the problems can be detected with ADiKtEd. Therefore if you have a map made in UnDed or ADiKtEd lower than 0.60, you should always perform these steps before even verifying the map:
- Make sure you are in slab mode.
- Press 'u' in slab mode to update the level graphics (DAT/CLM files).
- Enter thing mode (TAB key)
- Press 'u' in thing mode to fix things which are auto-created.
- Press F5 to save changes made to the map. You will probably see a warning message, but the map will be saved anyway.
Now, as all basic errors are fixed, you can use 'v' to verify the map. If any problem is found, you will see an error message in the status line. Otherwise, a message will appear:
Level verification passed.
You will have to fix all errors, one by one, untill you will see this message. Remember that you can always save and exit, leaving some errors for later. Rest of this chapter will learn you how to deal with some specific error messages.
4.2 Bad items count when loading "MAPFILE"
This warning is very common on UnDed maps. You don't have to do anything special to fix the problem - ADiKtEd will set proper count automatically when saving map.
4.3 Cannot open file when loading "MAPFILE"
The problem is that one of the level files is missing. If this is a warning message, and the map was opened anyway, then the file will be re-created on saving.
If the map couldn't be opened because of this problem, then one of the crucial files is destroyed. This usually means the map is lost.
4.4 Thing has wrong sensitive tile number at slab X,Y
This is a very common problem which can be found even in some original maps. Every 'thing' on the map has a tile which can affect it. Sometimes it is same with the thing position, sometimes it is set to none, and sometimes it can be set to somewhere around. For example, a torch has usually sensitive tile set to the earth/wall slab which it is on. This is why if you will dig the earth/wall, then the torch will disappear.
Having sensitive tile incorrectly set may cause serious graphics problems. This is why you should always fix the value. Follow these steps to fix sensitive tile number of a thing:
- Enter thing mode, select the problematic thing.
- Press 'k' to copy the thing into clipboard.
- Press DEL to delete the old thing.
- Press 'y' to paste thing from clipboard onto the map.
When pasting from clipboard, position and sensitive tile of the thing is automatically updated. The thing should now have sensitive tile properly set.
4.5 Thing trapped in solid column on slab X,Y
Things should only be placed on short slabs, like path or claimed ground. If a thing is placed inside solid cube, this warning is generated. There are two possible reasons: the thing is placed on subtile with tall column, or its height is set incorrectly.
To fix the problem, first check if the slab on which thing lays contains tall column in the place. If there is a column of height grater than 2, then you should move your thing into another subtile. Use copy and paste functions to move the thing into place with lower ground.
If the thing already is on a subtile with short column, then use '[' and ']' to change its height and make it to be over the ground level.
4.6 Problems in script
Script problems usually can't be solved in ADiKtEd. To fix a mistake in script, you must exit ADiKtEd and edit the .TXT file in external editor. You can use the editing utility from DKTools pack, or just any text editor, ie. Notepad.
4.7 Problems in column or DAT file
These problems can usually be solved by updating the level (pressing 'u') in Slab mode.
4.8 Other problems
ADiKtEd can show you hundreds of warning messages, and only a few of them were explained here. If you will see a message which does not fit any of the topics, and you can't understand it, please contact ADiKtEd developers.
5.0 ADiKtEd Configuration file
The configuration file for ADiKtEd is called map.ini. It is a text file with very simple layout, and it's easy to change it with any text editor, ie. notepad. Commands in the file are well commented inside it, and additional information is provided here.
5.1 UnDed and Official Editor compatibility
UnDed has some specific behavior which differs from ADiKtEd. Still, you may force ADiKtEd to emulate some of the UnDed characteristics.
The main difference is that UnDed creates maps where every tile is completely filled with its content. For example if you will place earth next to path, UnDed will fill all 9 subtiles of the earth with tall columns. ADiKtEd and Official Editor may in some cases leave one corner subtile short inside the earth slab. To make ADiKtEd compatible with UnDed, you should set these options in INI file to shown values:
UNAFFECTED_GEMS=1
UNAFFECTED_ROCK=1
FILL_REINFORCED_CORNER=1
FRAIL_COLUMNS=0
LOAD_REDUNDANT_OBJECTS=0
ADiKtEd replaces corners of slabs more often than Official Editor. To make it more compatible with Official Editor, you should set these options in INI file:
UNAFFECTED_GEMS=1
UNAFFECTED_ROCK=0
FILL_REINFORCED_CORNER=1
FRAIL_COLUMNS=1
5.2 FILL_REINFORCED_CORNER option


This option allows you choose what to place at reinforced wall corners. The value 0 means there will be earth at corners, 1 will place cobblestones there, 2 will also place cobblestones, but with some markings on. You can see the difference between value 0 and 1 on the image. The default is:
FILL_REINFORCED_CORNER=1
6.0 Keys
The following keys are shortcut keys for all work modes:
Command |
Key |
| Help for current work mode | F1 |
| Quit ADiKtEd | ctrl+q |
| Load map | ctrl+l |
| Re-load current map | F7 |
| Save on last file name | F5 |
| Save the map with new name | ctrl+s |
| Generate new, empty map | ctrl+n |
| Generate random map background | ctrl+r |
| Toggle Compass Rose | ctrl+p |
| Disable/Enable automatic updates of level graphics | ctrl+u |
| Enter Script mode | ctrl+t |
| Search for object type | ctrl+f |
| Generate bitmap miniature | ctrl+b |
| Enter texture selection mode | ctrl+e |
| Switch between Slab mode and Thing mode | Tab |
All other keys, specific for various work modes, can be always found by reading the help screen under F1 key.
7.0 Credits
Original author: Jon Skeet, skeet@pobox.com
Second developer: Tomasz Lis, listom@gmail.com
Documentation: Tomasz Lis
8.0 Changes log
Version 1.1
- Added explanation of some verification warnings
- Some configuration file information
Version 1.0
- Created based on ADiKtEd Tutorial
9.0 References
- Dungeon Keeper Mapmaker's Documentation
- Dungeon Keeper Script Commands Reference
- Mapmakers Installation Instructions
- ADiKtEd project page at SourceForge
- Dungeon Keeper Extras page