The Dungeon Keeper 2 Official Editor Manual v1.1
Modified by fans
2. Walkthrough 1: Making a Multiplayer/Skirmish Level
2.5.3. Availability/Researchability
2.8. Adding Heroes to your Level
2.8.1. Adding a Collapsing Hero Gate
2.8.4. Revealing the Hero Gate
3. Walkthrough 2: Making a Singleplayer Level
3.3.3. Availability/Researchability
3.10. Patrolling the Outer Walls
3.11. Defending the Inner Bailey
3.11.1. Hero Party 1: Giants and Knights
3.11.2. Hero Party 2: Elven Archers
3.12. Make the Lord of the Land into a Coward
3.15. Creating a Flyby Introduction
5.1. Sending your Levels to Other People
5.2. Playing Other Peoples' Levels
7.1. Setting Creature Properties
7.2. Setting Player Properties
7.4.3. Multiple instances of the party
7.7.1. Computer Players in Singleplayer Levels
7.7.2. Computer Players in Skirmish Levels
7.7.3. Computer Players: how they dig Gold
8.1. What is the Level Script?
8.2.1. Setting the Number of Repeats
9. Changing the Stats via the Configuration menu
9.1. Configuration/Terrain Types
9.3. Configuration/Creature Types
9.6. Configuration/Object Types
9.7. Configuration/Creature Spells
9.8. Configuration/Keeper Spells
11.2. Multiplayer and Skirmish Levels
The DK2 Editor is the tool which was used to create all the levels for Dungeon Keeper 2, and you can use it to design Singleplayer, Multiplayer, Skirmish or My Pet Dungeon levels.
It's more than just a level editor. Using the DK2 Editor you can also change the game statistics. For example you could set Imps to be the most lethal fighters in the game and set your Dark Angels to be effete cowards. This will be explained later in the manual.
This manual doesn't describe every single feature of the DK2 Editor, but if you follow the Walkthroughs and use the reference sections, you should be able to work out the answers to your remaining questions.
Refer to Section 6. Overview of the DK2 Editor explanations of some of the terms used in this Manual.
THERE IS NO "UNDO"
Save your levels frequently!
Making a Multiplayer or Skirmish level is a good place to start, since it's the simplest kind of level to make and will allow you to familiarise yourself with all the basic concepts.
You may find it helpful to print this section of the DK2 Editor Manual out so you can easily refer to it while creating your own level.
There are two sample levels in the Editor/maps/ folder which illustrate all the features described in this section of the manual. If anything doesn't seem clear to you, load the relevant sample level into the DK2 Editor and look at how it works.
The map Multiplayer Sample 01 is a very simple 4-player Multiplayer and Skirmish level created by following the instructions in Sections 2 to 2.7.
The map Multiplayer Sample 02 is the same map but with Heroes and a Hero Gate added to it by following the instructions in Section 2.8. Adding Heroes to your Level.
You can use the sample levels as templates to build your own level by altering the terrain, adding rewards, moving the Dungeon Hearts, etc.
Open the DK2 Editor either by double-clicking on the icon or by running the program "DK2 Editor.exe".
The Create New DK2 Level dialog will appear.
Height and width must be no greater than 128.
Size is important. If you make the map too small the players will be fighting before they've had a chance to build up any strength, and if it's too large they will wander round for hours before even seeing each other.
The game may run more slowly if the map is very large, since the game has to repeatedly analyse the map so that creatures can find their way around it.
Before you can save your level, the player must have a Dungeon Heart.
If you want to move the Dungeon Heart, first delete it by drawing a different terrain or room over any part of it, and then redraw it where you want it.
A DK2 level comprises 6 different files, with the file extensions .kld or .kwd. The DK2 Editor will automatically create all these files when you save your level. In order to play your level, all 6 files must be in the correct folder on your computer's hard drive.
If you've installed DK2 and the DK2 Editor in the default directory, then your levels will be saved in the correct place by default. Otherwise you will need to choose Save As from the File menu and save your level in the folder Dungeon Keeper 2:\data\editor\maps\, or it won't appear in the game.
Save your level frequently and make a backup copy before making major changes to it.
Checking the Multiplayer and Skirmish boxes will cause your level to appear on the lists of available levels when you run the game (provided you've saved the map files in the correct folder). Note: a map can be either Multiplayer, or Skirmish, or both.
The Average Time and the Level Rating are used to calculate the Total Evil Rating on the Debriefing Screen. Actual Average Times vary from level to level, but the following values provide a rough guide:
Number of Players |
Average Time |
Level Rating |
| 2 | 60 | 1.042 |
| 3 | 90 | 1.02 |
| 4 | 120 | 1.01 |
As you have probably already guessed, if you leave the Level Rating at 1 it won't make an enormous amount of difference to a Multiplayer level.
Now it's time to draw the landscape of your new realm.
By default, the Paint tool is selected so that you can draw terrain using the mouse cursor like a paintbrush. In addition, you can choose the Draw Line, Draw Rectangle, and Draw Circle drawing tools from the toolbar. Right-click on the map to toggle between drawing solid and hollow rectanges or circles.
The Fill tool allows you to fill in an area with a single terrain type. Make sure to save before using this tool as the results can be unpredictable.
Remember to place sufficient gold on the map for the players' needs. If it's a Skirmish level, then make sure to place the gold in separate, solid seams because this will be easier for computer players to dig out (for obscure reasons best know to the programmers)
Select the Neutral Player on the Script Tree and then place rewards for the players to find as they explore the map, such as:
Specials and Creatures must be placed on open terrain such as Dirt Path, not on Rock.
Repeat until there are as many players as you want: 4 is the maximum allowed.
Before your level can be played, some data must be entered for each player.
This is the amount of gold which the player has at the start of the level. It shouldn't exceed 16,000 since it has to fit in their Dungeon Heart.
If you select a type of creature from the drop-down list, a number will be shown to the right of the creature's name. This is the maximum number of creatures of that type which that player's Creature Pool can contain, and hence the maximum number which they can recruit through Portals.
By default the Creature Pool contains 0 creatures of each type, so you must enter a number for each type of creature you want the player to be able to recruit through the Portal. 30 is a reasonable value, bearing in mind that a player's first Portal will allow them to recruit a total of 15 creatures, and each additional Portal they claim will provide another 5 creatures.
Salamanders are only supposed to appear on levels with lava, so only enter a value for Salamanders in the Creature Pool if there is lava on your map.
If you have used the DK1 Editor you should take note that in DK2, each player has their own individual Creature Pool rather than competing for a common Creature Pool. Setting the number in the Creature Pool to zero is equivalent to making the creature unavailable to that player.
Each Room, Trap, Keeper Spell and Door may be set to Available, Unavailable or Researchable for each player. The check box beside the list indicates the status of each item:
| Check Box | Status of Item |
| Clear | Unavailable |
| Grey Tick | Researchable |
| Black Tick | Available |
To make all the Rooms available to Keeper 1, make the current Room available and then click the Apply to All button. This doesn't alter the Room availabilities for the other players.
The players' researchers will research Spells first, then Rooms, Doors and Traps.
Once you have set the properties of Keeper 1, you should set the other players' properties to the same values.
Give each player 4 Imps so that they can start digging out land immediately. Make sure to select Keeper 2 before placing Imps on Keeper 2's Dungeon Heart.
If you don't place any Imps, then the computer will create 4 per player after a short delay.
Your new level can now be played. The last Keeper left alive will automatically be the winner in a Multiplayer or Skirmish level.
Save your level in Dungeon Keeper 2:\data\editor\maps\, and run the game. Your level should appear on the appropriate lists of maps. If it doesn't, check that you saved the level into the correct folder and that Multiplayer and/or Skirmish are ticked in the Edit Level Variables dialog.
Before distributing a Multiplayer level, play it in Skirmish mode a number of times.
What you've done so far is to make a basic Multiplayer map in which a number of Keepers battle for supremacy in an otherwise empty land. A Hero presence will add a new dimension to your level.
This section of the walkthrough describes how to add Hero Traps and Hero Parties to your level. To do this you will have to create a number of new items on the Script Tree and various triggers and actions. This is more complicated than just drawing a Multiplayer map but the results can be well worth the effort.
As ever, the watchword is "Play It"! It's the only way to tell whether your script works correctly, and whether your level is fun to play.
The 2x2 Hero Gate is supposed to collapse if a player claims all the land surrounding it, but this doesn't happen automatically: it has to be set up by the Level Designer. This process is a bit fiddly but it's worth doing it now because it will make life easier later on.
Firstly create an Action Point, which will be used to detect when the surrounding land has been claimed.
The Action Point needs to be 4 tiles wide, 4 tiles high and centred on the 2x2 Hero Gate.
The Action Point will appear on the Script Tree, automatically numbered Action Point 1. If you haven't placed it correctly, right-click on it on the Script Tree, choose Move Action Point from the popup menu, and redraw it on the map. Watch out when moving Action Points: if you move the Action Point and then click on the map again, you'll create another Action Point. Select something else to stop drawing Action Points. Action Points can be deleted by right-clicking on them and selecting Delete Action Point.
Now you need to create triggers which will fire if any player claims the land surrounding the Hero Gate.
Slab Types Equal to 12 of Any Type owned by Keeper 1
As you move the mouse over the map, the current position of the mouse is shown in the Info Bar at the bottom of the screen. Make a note of the co-ordinates of the top left tile of the Hero Gate, which is marked with a yellow arrow in a box.
The trigger you have just created should be hanging off Action Point 1 on the Script Tree.
Collapse Hero Gate at x, ywhere x and y are the co-ordinates you just wrote down.
Finally, you need to set a Flag to indicate that the Hero Gate has been collapsed - this is a bit like making a note for yourself. A Flag is similar to a variable in programming, and all Flags are initially set to 0.
Flag 1 = 1
You will be able to use a trigger at any point in the script to check the value of Flag 1 before creating Heroes at the Hero Gate. If it is 0, then the Hero Gate is still intact and new Heroes may enter through it. But if Flag 1 = 1 then the Hero Gate has been collapsed and you should not create Heroes at it.
To summarise, you should now have a section on your Script Tree which looks like this:
[ID 1] Action Point 1 [x1, y1] - [x2, y2]
    T: When Slab Types: 12 Slabs [Keeper 1]
        A: Collapse Hero Gate At [x, y]
        A: Flag 1 = 1
This will cause your Hero Gate to collapse if Keeper 1 claims the land which surrounds it. Now you need to create triggers to collapse the Hero Gate if the land is claimed by Keeper 2, Keeper 3 or Keeper 4.
This creates a copy of your trigger and all the triggers and actions which hang off it.
Repeat twice more, changing the When Slab Types: 12 Slabs [Keeper 1] triggers to read Keeper 3 and Keeper 4.
Placing Hero-owned traps near the Hero Gate will prevent the first Imp which reaches it from collapsing it. Traps must be placed on land belonging to the same player as the trap.
In order to make Heroes appear at the Hero Gate, you should first define a Hero Party. Although the Hero Party will appear on the Script Tree, it will not appear in the game until it is created with a specific action.
A Hero Party can contain up to 16 creatures. If you want them to be able to get through rock or gold, make sure to include some Dwarves in the Hero Party.
Once the Hero Party has been defined, it will appear on the Script Tree and you can set the properties of its members. The most important member of any Hero Party is the Leader: whatever he does, the others will follow. If necessary he will instruct a Dwarf to tunnel towards his goal. The Leader has an L beside him on the Script Tree. All the other party members are Followers.
This shows how Action Points can be used as waypoints for Heroes. The leader will head for Action Point 1, but when he arrives he won't know what to do next unless you alter the properties of Action Point 1:
When the Leader reaches Action Point 1, he will wander around randomly for 20 seconds, then return to Action Point 1 again. This will look much better than him standing rooted to the spot, which is what would happen if Action Point 1 didn't point anywhere.
Now that the Hero Party has been defined, it's time to add the triggers and actions which will cause it to appear in the game when any Evil creature approaches the Hero Gate.
Congregate In >= 1 creature <any type> owned by <Keeper 1>
Flag 2 = 1
The script above will cause Flag 2 to be set to 1 when any of Keeper 1's creatures enters Action Point 1. Now some more triggers and actions are needed in order to detect when creatures belonging to other Keepers enter the Action Point.
Congregate In >= 1 creature <any type> owned by <Keeper 2>
Repeat for Keeper 3 and Keeper 4, if they exist in your level. These triggers will ensure that when any evil creature enters Action Point 1, Flag 2 will be set to 1.
Flag 2 = 1
The script you have just written will cause Hero Party 1 to be created at the Hero Gate when any Evil creature sets foot in the area surrounding the Hero Gate. By using Flag 2 you have ensured that Hero Party 1 will only be created once although the Action Point has one trigger for each Keeper.
First, use Action Points to define a patrol route:
Next define the Hero Party which you want to walk round your patrol route.
In the Edit Creature Properties dialog, set the leader's objective to go to any Action Point on the route. He'll travel to that Action Point first, and then continue around the patrol.
Now create the Hero Party in the level:
This level's time >= 0
It's always safer to use an inequality when setting a time trigger. Otherwise, there is a chance that the trigger may not be processed at the right moment and it will never fire.
Now add an action to this trigger which will cause Hero Party 2 to be created at Action Point 1.
Create Hero Party: Hero Party 2: At Action Point 1
Hero Party 2 will be created at the Hero Gate at the start of the level, and will set off to follow the patrol route you have defined. They will continue around the circuit unless attacked. If the attackers leave them alone, they will then go back to their patrol.
One of the DK2 Editor's most endearing features is that you can hang triggers off creatures or Hero Parties on the Script Tree. This will allow you detect when the patrolling Heroes have been defeated and send a new Hero Party to replace them. After all, everybody knows that Heroes are suckers for punishment.
When Members Incapacitated equal to nWhere n is the number of creatures in the Hero Party.
Flag 3 = 1
So when the Hero Party is defeated, Flag 3 will be set to 1 and Timer 1 will start ticking.
For the replacement party, you will create a second instance of the original Hero Party. All the triggers and actions which hung off the Hero Party will be cancelled, and created afresh on the new Hero Party. This will allow you to set up a repeating script which automatically generates a replacement patrol force every time the old one is destroyed.
The script for this section is a bit complicated � go through the instructions step by step to make sure you've created the script correctly. Note that you need to hang the triggers off one another in series, so that only when the conditions for all the triggers are met will the actions happen.
Level's Name
    T: When Flag 3 = 1               (when Hero Party 2 destroyed)
        T: When Timer 1 >= 120       (and 2 minutes have passed since it happened)
            T: When Flag 1 = 0       (and if the Hero Gate hasn't been collapsed)
                A: Create Hero Party 2 at Action Point 1
                A: Flag 3 = 0
(Key: T: means it's a Trigger, A: means it's an Action)By setting the three triggers to repeat 30 times, you have ensured that the Hero Party will be replaced 30 times. You could set them to repeat Always, but Always triggers should be used with great caution because it can lead to the creation of infinite numbers of creatures, at which point the game will crawl to a halt and probably crash.
Note: if Flag 3 were not reset to 0, then 30 instances of Hero Party 2 would be created in quick succession, rather than one being created when the previous instance is defeated.
Finally, how about giving all the players a view of the Hero Gate? It's always worth making sure the players actually notice the key features of your level.
Hang the following trigger and action off Keeper 1:
T: When level's time >= 0         (choose the Attribute tab)
    A: Reveal Action Point 1      (choose the Action Point tab)
This will only reveal the Hero Gate to Keeper 1. Copy this sequence onto Keeper 2, Keeper 3 and Keeper 4 and they will all see it.
Congratulations!
Your level is now ready to play. Save it, then play it through and check that
everything works as you intended before releasing the level.
A Singleplayer level is more complex to design than a Multiplayer level, because the level designer has to create all the strategy themselves by means of the level script.
This walkthrough will show how the sample level Singleplayer Sample was made. By following this walkthrough, you will become familiar with the key concepts involved in making a Singleplayer level.
This objective of this level is to assault a Hero stronghold and kill the Lord of the Land, who is carrying the Portal Gem.
The Heroes will be set up so that if the player attacks their stronghold via the obvious front gate, they will be attacked by waves of tough Heroes. But if they attack from the side or rear, they will be able to pick the defenders off a few at a time.
There is a level called Singleplayer Sample in the ./Editor/maps/ folder, which illustrates all the features described in this section of the manual. If anything doesn't seem clear to you, load the sample level into the DK2 Editor and look at how it works.
Additionally, you can use the sample level as a template to build your own levels by altering the terrain, adding rewards, moving the Dungeon Hearts etc.
Open the DK2 Editor either by double-clicking on the icon or by running the program WorldEditor.exe.
The Create New DK2 Level dialog will appear.
Before you can save your level, the player must have a Dungeon Heart.
If you want to move the Dungeon Heart, first delete it by drawing a different terrain or room over any part of it, and then redraw it where you want it.
A DK2 level comprises 6 different files, with the file extensions .kld or .kwd. The DK2 Editor will automatically create all these files when you save your level. In order to play your level, all 6 files must be in the correct folder on your computer's hard drive.
If you've installed DK2 and the DK2 Editor in the default directory, then your levels will be saved in the correct place by default. Otherwise you will need to choose Save As from the File menu and save your level in the folder Dungeon Keeper 2:\data\editor\maps\, or it won't appear in the game.
Save your level frequently and make a backup copy before making major changes to it.
The Modify Player Properties dialog allows you to define which items will be available to the player, which creatures they will be able to recruit, and how much gold they start with.
Note: Section 2.5: Set Player Properties explains Player Properties in more depth.
This is the amount of gold which the player has at the start of the level. Leave this at 3,000.
If you select a creature from the drop-down list, a number will be shown to the right of the creature's name. This is the maximum number of creatures of that type which the player's Creature Pool can contain.
For Singleplayer Sample, set the number of each type of creature in the Creature Pool to 20.
Each Room, Trap, Keeper Spell and Door may be set to available, unavailable or researchable. The check box beside the list indicates the status of each item:
Check Box |
Status of Item |
| Clear | Unavailable |
| Grey Tick | Researchable |
| Black Tick | Available |
To make all the Rooms available to the player, make the current Room available and then click the Apply to All button.
For Singleplayer Sample, make all Rooms, Doors and Traps available. Make the Possession and Create Imp Keeper Spells available, but make all the rest of the spells researchable.
Give the player 4 Imps so that they will be able to start digging out immediately.
Note: If you don't give the player any Imps, after a short delay the game will create some for them.
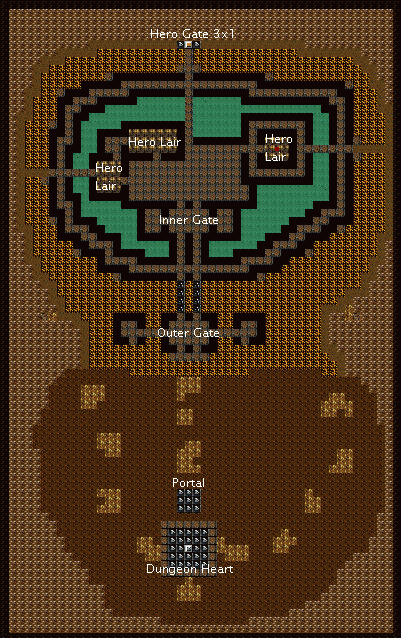
The level Singleplayer Sample has an area of rock and gold at the bottom of the map for the player to build their Dungeon in, and a Hero stronghold at the top of the map. There's a picture of the level on the next page, as it appears in the DK2 Editor.
When you are creating the Hero stronghold, make sure you have selected the Good Player on the Script Tree before drawing Claimed Path, Reinforced Wall or Hero Lair on the map.
Hero Gate 3x1 is found on the Rooms tab of the Object Selection Bar. This also should only be drawn with the Good Player selected.
The Portal should be placed with the Neutral Player selected.
Select the Good Player, choose a type of Door from the Doors tab, and then place the Door on the map. Doors should be placed on Claimed Path owned by the same player, and between two walls which will support the Door.
In Singleplayer Sample, there are a number of Secret Doors in the Hero fortress. These will automatically open as Heroes walk past, thereby revealing that they are not Reinforced Wall. Any Doors which the Heroes won't actually go through may be locked so that they will remain secret.
Traps should be placed in the same way as Doors, but they don't need to be between walls.
The level must be scripted so that when the Lord of the Land is killed, Horny will appear and collect the Portal Gem from his fallen body.
Place him in the Hero Lair in the eastern part of the Hero Stronghold.
Heroes will only return to the Hero Lair to heal if the box is checked in their Properties dialog. So this box should be checked for every Hero on the level, along with choosing their experience level and gold held.
His Objective will be changed later, but Wait will do for now and will prevent him from attacking the player right at the start of the level.
When This Creature Created
Attach Portal Gem
The Lord of the Land is now carrying the Portal Gem.
Make objective Kill
The Lord of the Land will now have the spiky Health Flower which marks him out as the player's prime objective, and once he has been seen by the player, an Objective Pointer will always point the way to him.
The next trigger will detect when he is killed.
When This Creature Dying
Flag 1 = 1
The Flag is used because although the When This Creature Dying trigger has to be hung off the Lord of the Land, the action Win Game will have to be hung off the player.
When Flag 1 = 1
Your level is now functional, if dull. The player can build up their Dungeon, recruit creatures, and then attack the Lord of the Land, having to battle past Hero Traps and Doors on the way. When the Lord of the Land is killed, Horny will appear and claim the Portal Gem.
In order to play a Singleplayer level, you need to run DK2 from the command line. Click on the Start button at the left end of the Windows Taskbar, and choose Run from the popup menu. If you have installed Dungeon Keeper 2 in the default directory, then to play the level Singleplayer Sample, you should copy the following text into the box and then click OK:
"C:\Program Files\Bullfrog\Dungeon Keeper 2\DKII.exe" -q -level "singleplayer sample"
If you have installed DK2 elsewhere, then type in the correct path for your copy of DK2, and to run a different Singleplayer level, replace the text "singleplayer sample" with the name of your level.
The fortress's main entrance ought to be defended. So place a couple of Good-owned Elven Archers on the terrace outside the Outer Gate, where they will be able to fire across the lava at your creatures.
Place some Guards in the Outer Gatehouse, and a Special in each of the side rooms so that the player will receive a reward after their first fight in the level.
When this creature attacked
Set Creature Objective kill player Keeper 1
And do the same for the other Elven Archer and the Guards. Now they will wait until attacked, at which point they will try to kill the player. If injured, they will try to go to the Hero Lair to heal.
An Action Point can be used to detect when the player's creatures enter the Inner Gate and cause Heroes to emerge from the side rooms and attack them.
Congregate in >= to 2 creatures any type owned by Keeper 1
Flag 2 = 1
Now place 3 Monks in each of the rooms to the side of the Inner Gate. Set each to Wait.
When Flag 2 = 1
Set Creature Objective kill player Keeper 1
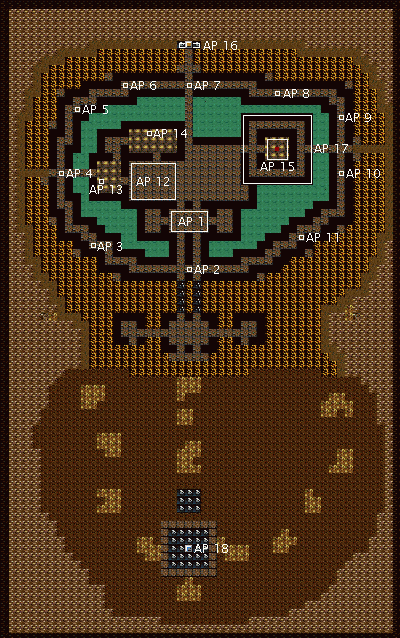
Create a series of Action Points which define a patrol route around the outer walls of the Hero fortress. In Singleplayer Sample these are Action Point 2 to Action Point 11. The screenshot below shows all the Action Points on the level, including some which will be used later.
Place one Guard near each of Action Points 2 - 11. Set each Guard's Objective to be Send to Action Point, and choose the Action Point to which that Guard is nearest. Now the walls of the fortress will be continually patrolled by the Guards.
Once the player has breached the walls or taken out the Gates, their Imps will begin to claim the Inner Bailey. Use another Action Point to trigger a Hero attack when the player claims a certain area of the Inner Bailey:
When Slab types >= 1 any type owned by Keeper 1
Initialise Timer 1
Rather than placing more individual Heroes on the level, a Hero Party will be created to defend the Inner Bailey.
Hero Party 1 in Singleplayer Sample comprises Giants and Knights. Set the level and gold held of each member of the Hero Party, and check Return to Hero Lair.
Create an Action Point in the Hero Lair for the Hero Party to wait at until it's time to attack the player:
The Leader of the Hero Party is the most important member. He's the one with an L beside him on the Script Tree. The rest of the Hero Party will follow him regardless of what their objectives have been set to.
Send to Action Point, Action Point 13
The Hero Party currently exists only in potential: it must be created at an Action Point.
When this level's time is >= 0
Create Hero Party 1 at Action Point 13
Finally, set the Hero Party to attack when the player claims any land within Action Point 13.
When Timer 1 >= 60
Set creature objective Kill Creatures Keeper 1
The use of the Timer allows you to set a delay between the land being claimed and the Hero Party attacking. Adjusting this delay will alter the flow of the level and be useful for balancing it.
The player will be attacked by two waves of Heroes, firstly by Hero Party 1 and then 30 seconds later by Hero Party 2.
Place another Action Point on the central area of Hero Lair. This should be Action Point 14. Set its Next Waypoint to be Action Point 14 (ie itself) and its Wait Delay to 5 seconds.
Define a second Hero Party containing Elven Archers. Set the leader to go to Action Point 14.
Create Hero Party 2 at Action Point 14
When Timer 1 >= 90
Set creature objective Kill Creatures Keeper 1In order to keep the player under pressure, when 4 of the Elven Archers have been killed, a few Fairies will attack.
When >= 4 Members Incapacitated
Flag 4 = 1When Flag 4 = 1
Set creature objective Kill Creatures Keeper 1If the Lord of the Land is drawn out of his fortress by the player's creatures, and then they withdraw, if his objective is Wait then as soon as there are no enemies in sight he will stand rooted to the spot looking like a complete lemon. It would be better to change his objective to Send to Action Point so that he will return to his fortress.
Not only does the Lord of the Land skulk in his fortress, but also he has a cohort of top Wizards to defend him.
Place a number of Wizards around the Lord of the Land. Set their Objective to Send to Action Point 15, so that they will also keep returning to the centre of the fortress and thus stay near the Lord of the Land.
If these Wizards believe that they are in trouble, they will summon a final Hero Party to defend the Lord of the Land.
When This Creature Dying
    Flag 3 plus value 1
This is a new way of using Flags: Flag 3 is now a counter which is incremented each time one of the Wizards is defeated.
When Flag 3 is greater/equal to value 2
    Create Hero Party 3 at Action Point 16
When any two or more of the Wizards have been defeated, Hero Party 3 will appear at the Hero Gate 3x1.
The final touch is to create an introductory flyby which shows the player the Lord of the Land and his Wizards skulking in their fortress.
A small red square will appear on the map where you clicked. This indicates where the player's view will be centred when the level first starts. Create the following script hanging from Keeper 1:
When this level's time >= 0    (Attribute trigger)
    Reveal Action Point 17     (Action Point action: make sure Reveal is chosen, not Conceal)
    Rotate around Action Point 17 relative: for 10 secs at 360 Degrees (Action Point action)
    Set Widescreen Mode On     (Info action)
This will rotate the camera around Action Point 17 in a complete circle, taking 10 seconds to do so. The action Set Widescreen Mode On will cause the GUI to disappear, the player to lose camera control, and the screen area to be shown in widescreen style so that the player knows this is a scripted camera sequence.
Once the camera flyby is complete, the Lord of the Land needs to be concealed again. Hang the following GUI trigger and Action Point and Flag actions from the trigger above, When this level's time >= 0:
When transition ends
    Zoom to Action Point 18    (returns the camera to the Dungeon Heart)
    Conceal Action Point 17    (hides the Lord of the Land's fortress)
    Flag 5 = 1                 (this flag will be used below)
    Set Widescreen Mode Off    (Info action)
The trigger When transition ends will fire either when the camera rotation is complete, or when the player hits the Space Bar in order to skip the flyby.
Since the Lord of the Land has been revealed to the player, the Objective Pointer will appear on the screen. In order to stop this from pointing to the Lord of the Land from the beginning of the level, the script has to do a bit of jiggery-pokery.
Hang the following Flag trigger and Game actions from the Lord of the Land:
When Flag 5 = 1
    Make Objective (Off)
    Make Objective (Kill)
Trust me. It works.
My Pet Dungeon levels all have almost identical scripts, which introduce the items to the player in a set order. The easiest way to make a My Pet Dungeon level is to rename an existing one and change the map. The script can be updated to give different victory conditions and bonus scores, but the text cannot be altered.
Check the "My Pet Dungeon" box in the Level Variables dialog and the game will be able to find your level � when playing the game click "Other" in the My Pet Dungeon level selection screen in the game and your level will appear on the list.
Note: the flag I am a tool is used in My Pet Dungeon levels only. It should be checked for creatures which are placed in the Hero Tool Box at the start of the level. The player will be able to pick them up and drop them.
When sending levels to other people, make sure you include all files needed to play the map. You must include all .kld and one .kwd file.
You may also include the thumbnail bitmap .bmp file.
The best way to make sure that other people will get all the files is to compress them using .zip format, or other popular one.
When downloading files from the Internet, make sure your source is safe. If you've downloaded an .exe file, which is supposed to be a map, think twice before running it. The real DK2 map files (.kld, .kwd and .bmp) cannot be infected with viruses, but any other file attached to the map may be dangerous. Even some archive formats can contain dangerous code.
The safest would be to never use any map, which comes in different format than standard .zip archive.
The DK2 Editor is powerful but complex and it's worth getting the hang of the basics before doing anything really fancy. Start by making some simple levels which work and are fun: then try making more complex or off-beat ones.
The DK2 Editor has not been fully debugged, and it still contains some features which were needed by the development team but aren't necessarily suitable for the home user. If you stick to the features described in this document you should be ok. If you start experimenting with the game variables or some of the weirder triggers and actions, things may stop working. Life's all about taking risks.
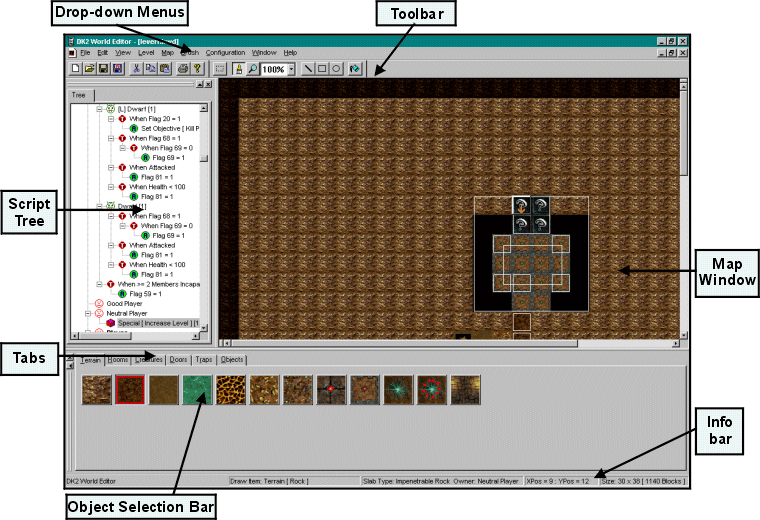
The picture shows the Main Screen which you will see when you are using the DK2 Editor. The different areas of the screen are described in the following sections.
The Script Tree is on the left-hand side of your screen and it serves two purposes.
Firstly, the Script Tree displays every player, creature or object in the level and allows you to edit its properties.
Secondly the Script Tree displays every trigger and action which you have created. Triggers and actions are what you use to script your level, and they all hang off the items on the Script Tree.
Three players are always present on the Script Tree: Keeper 1, the Good Player and the Neutral Player. Keeper 1 is the human player. The other two cannot be played by a human player, and they have no AI at all. The Good Player is there to "own" any Heroes or Hero terrain you may want to place; the Neutral Player is there to "own" objects such as Specials, unclaimed terrain and neutral creatures. If you add other players to your level they will appear on the Script Tree as Keeper 2, Keeper 3 and Keeper 4.
This shows the terrain of your level. Any items you have placed on the map will be shown, though they may not be visible unless you zoom the view in a bit.
The Object Selection Bar is your primary tool when creating a new level since you use it both to draw the terrain and to place items.
First click on the Script Tree to select the player to whom you want the new item to belong. Then click on the tabs to determine whether you are placing Terrain, Rooms, Creatures, Doors, Traps or Objects. Select an item from the Object Selection Bar and click on the map to place it.
Some items are specific to a particular player. For example Hero Lair should be placed with the Good Player selected, and Specials will belong to the Neutral Player regardless of which player was selected on the Script Tree when they were placed.
Creatures and Objects must be placed on open terrain, such as Dirt Path or Claimed Path. Traps must be placed on Claimed Path belonging to the same player as the Trap. Doors follow the same rules as Traps, but additionally must be placed between two solid tiles such as Reinforced Wall.
You can change the properties of some of the items once you've placed them on the map. These include Creatures, Dungeon Hearts, Hero Gates and Keepers. Right-click on the item either on the map or on the Script Tree, and choose Edit Properties from the popup menu. There's more information about Creature and Keeper properties in Section Setting Creature Properties and Section Setting Player Properties.
If you right-click on a creature, either on the Script Tree or the map, you can choose Edit Creature Properties from the popup menu. In this dialog, you can set:
The behaviour of a creature is heavily affected by which player owns it. If it is owned by the Neutral Player, it will hang around waiting to be claimed without ever getting hungry or angry. Creatures owned by Keepers will need to eat and sleep, and will go off and do jobs which they like such as training or research.
Creatures owned by the Good Player will not get hungry, tired or angry and will not do any jobs. However, they can be given objectives by the level designer, so that they will follow a patrol route, try to release captured comrades or destroy rooms owned by a Keeper. When attacked, they will fight, but otherwise they will pursue the objectives which have been set for them in the DK2 Editor.
If you right-click on any Keeper on the Script Tree, you can choose Edit Player Properties from the popup menu. In this dialog you can set:
Right-click on any player and choose Edit Player Alliances from the popup menu. You can now set players to be allied to each other at the start of the level. Alliances can be changed during the game by means of a Game action, Set Alliances.
The Creature Pool can be visualised as a group of creatures waiting eagerly to enter a player's Dungeon. Each player has their own Creature Pool and the numbers and kinds of creatures in this group are determined by the rooms which the player has built. Each time that the Portal admits a new creature, this recruit will be chosen at random from the Creature Pool.
The Creature Pool cannot contain ordinary Vampires or Skeletons, because they do not enter through the Portal, but are instead generated in the Graveyard and Prison. However, Elite Vampires and Elite Skeletons should be placed in the Creature Pool.
An Action Point is a rectangular area which you define on the map. Create an Action Point by right-clicking on the name of the level at the top of the Script Tree and choosing Create New Action Point from the popup menu. Now place Action Points on the map by clicking, dragging the mouse and releasing it. The Action Points will automatically be numbered and appear on the Script Tree.
Action Points can be used in a number of ways. For example you can detect when creatures belonging to a particular player enter the Action Point, or if a player builds rooms in it, or a player tags all or part of the Action Point.
You can create Hero Parties at an Action Point, reveal the area to a particular player, and a player's view may be zoomed to or rotated around the Action Point.
Action Points can also act as waypoints for Heroes and Hero Parties, and one Action Point may be set so that it leads to another. A Hero which has been set to travel to the first Action Point will automatically continue on to the next one in the sequence, so that a complex patrol route can be set up for Heroes to follow.
If you select an Action Point on the Script Tree, it turns blue to help you find it on the map. Right-clicking on an Action Point will allow you to redraw it or delete it.
A Hero Party is a group of Heroes with a common purpose. The level designer can control what the Hero Party does, including where it goes, whether it tries to free Heroes kept in Prisons, and whether it destroys the Keeper's rooms.
First the Hero Party must be defined so that it exists on the Script Tree. To do this, right-click on the name of the level at the top of the Script Tree, then choose Create New Hero Party from the popup menu. The Create Hero Party dialog will appear. Choose party members by clicking on the Object Selection Bar: a Hero Party can contain up to 16 creatures. Click Finished when you are done. The Hero Party will be automatically numbered and shown on the Script Tree.
You can delete members from a Hero Party by selecting the Hero on the Script Tree and pressing the Delete key, or by right-clicking on the Hero and choosing Delete Creature from the popup menu. Members can be added to an existing party by right-clicking on the Hero Party on the Script Tree and choosing Add Members.
Next create an Action Point on the map which is centred on the place where you want the Hero Party to appear. If you want to create the Hero Party at a Hero Gate, define an Action Point which just covers the Hero Gate.
Finally, you need to add a trigger and action to the Script Tree which will make your Hero Party appear at the Action Point at a particular moment. For example, the following trigger and action would create Hero Party 1 at Action Point 1, 30 seconds into the level:
T: When this level's time >= 30
    A: Create Hero Party: Hero Party 1: At Action Point 1
The most important member of any Hero Party is the Leader. Whatever his or her objective is, the rest of the Hero Party will go along with it. This means that all you have to do is set the leader to attack the player or go to an Action Point or whatever, and the whole group will follow the same objective.
When the Leader is incapacitated, a new Leader is chosen at random. Any triggers and actions which hung off the old Leader are transferred to the new.
It's possible to have two instances of the same Hero Party existing at once. However, in order to avoid confusion, all the triggers and actions are transferred to the most recently created version of the Hero Party.
A Hero Gate is the entrance which Heroes use to travel from the sunlit overlands to the dungeon underworld. However they don't work automatically. In order to get a Hero to enter your level via a Hero Gate, you need to do the following things:
When this level's time >= 0
    Create Hero Party 1 at Action Point 1
There are three kinds of Hero Gate which you can use:
In the DK2 Campaign, the player wins a level when they have found that realm's Portal Gem and Horny has materialised to collect it. If you are creating a Singleplayer level, you should script the level so that this will happen when the player has completed the level's objectives.
Don't put Portal Gems into Multiplayer or Skirmish levels, because those levels will end automatically when there's only one Keeper left.
The Portal Gem must first be created on the Script Tree. It may then be necessary to add an action which then makes the Portal Gem actually appear in the level, depending on what the objective of the level is. Finally, the action Win Game causes Horny to materialise and the level to end - see below for details of how to script your level in each case:
When killed by any player
Flag 1 = Flag 1 + 1When Flag 1 = 3 (this is for a level with 3 other Keepers)
Win Game (Game action)When this creature created (Event trigger)
Attach Portal Gem (Creature action)
Make Objective kill (Game action - creature's Health Flower will show
that killing this creature is the player's objective)
When this creature killed (Event action)
Flag 1 = 1When Flag 1 = 1
Win GameWhen the creature is killed, the Portal Gem will automatically appear by its body and Horny will appear to collect it.
For example, the objective might be to claim a particular tile of land. The Portal Gem could be placed on that tile of land, and Action Point 1 created to just cover the tile.
In that example, this script should be hung from Action Point 1:
When Claim All of slabs claimed by Keeper 1 (Tests that the player's objective
has been achieved)
Create Portal Gem (Game action - causes the Portal Gem to appear)
Flag 1 = 1
And this script from Keeper 1:
When Flag 1 = 1
    Win Game
In a Singleplayer game, the level designer can create Computer Players as opponents for the player, and can determine how they will behave.
Create a new player on the Script Tree (remember to give them a Dungeon Heart) and check the Computer Player box in the Modify Player Properties dialog. You can then click the Computer Player Properties button and change the behaviour of the computer player.
First choose one of the pre-defined Keeper types from the drop-down list. Then click the Set Defaults button, which will restore all the player's properties to the defaults for that Keeper type.
These are the Keeper types which are available in Skirmish games, but you are not limited to them. You can change any aspect of the Keeper's behaviour in the dialog boxes, from what order they build their rooms to when they will launch an attack on a rival.
Once you've defined the Keeper to be computer controlled, you can set its Build Area. Right-click on the Computer Player's name on the Script Tree and choose Define Build Area. Then draw a rectangle on the map covering all the area you want the Computer Player to be prepared to build in. It won't build any rooms outside that area.
Top Tip: You can make a Computer Player attack at a certain time by setting it to attack when all Keeper Spells researched (Initial Attack tab of the Computer Player Properties dialog), and then adjusting the number of Keeper Spells which are researchable for that player until it attacks at the moment of your choice.
The level designer cannot determine the behaviour of the Computer Players in Skirmish games � the player chooses which of the 9 default types of Computer Player he or she will compete against in the Skirmish setup screen.
When designing a Skirmish level, you should take into account that the Computer Players ARE NOT VERY INTELLIGENT and may not be able to cope with your level, for example they may have trouble finding Portals if they are too far away or the map is too complex. So play your Skirmish level before releasing it, to check that all the different types of Computer Player can compete reasonably well.
Computer Players don't appear in Multiplayer levels.
When a Computer Player tags gold, it tags all the gold within a certain area. If there are a lot of little individual patches of gold, there is a danger that the Computer Player may not tag a route for its Imps to dig to the gold. The Computer Player will then gets itself into a total mess and probably fail to build another room. Hence it is better to place gold in well separated solid areas.
The Level Script is a series of instructions which make things happen while the level is being played. The level designer creates the Level Script by defining triggers and actions on the Script Tree.
The Script Tree has a strict hierarchy and all your triggers must hang from the right part of the Script Tree. For example, an Action Point trigger can only be hung off an Action Point.
Flags and Timers are at the top of the hierarchy and triggers which refer to them may be created anywhere on the Script Tree. That's part of what makes them so useful.
To create a new trigger, right-click on any item on the Script Tree and choose Add Trigger from the popup menu. You will then see the Edit Trigger Properties dialog. Here you can choose the type of trigger and set the conditions under which it will fire. The new trigger will hang from the item you right-clicked on.
For example, the following trigger and action may be created anywhere on the Script Tree. The effect of this script will be to make Treasury available to Keeper 1, 20 seconds after the level begins.
Trigger: when this level's time >= 20
    Action: Make Room Treasury available to Keeper 1
You can hang one trigger off another, for example:
Trigger: when this level's time >= 20
    Trigger: when Flag 1 = 1
        Action: zoom to Action Point 1
In the script above, the action will take place when the conditions for both triggers to fire are satisfied. So when at least 20 seconds have passed since the start of the level, and Flag 1 has been set to 1, the player's camera will zoom to Action Point 1. This script has to hang from a Keeper because it is specific to a particular player.
The Edit Trigger Properties dialog has a tab marked Repeat. This allows you to set the number of times which that trigger will fire. All triggers fire once by default.
Generally it's safer not to set triggers to repeat Always. This is because if you've made a mistake in your script you may end up with something bad like infinite numbers of Hero Parties being generated and it will never end until the game crashes. Setting the repeat to (say) 30 is more prudent.
An Attribute trigger tests the properties of the level. If the trigger hangs from a creature then it can also test properties of that creature. Example triggers include:
When this level's time >= 30               (the trigger will fire 30 seconds
                                            after the start of the level)
When this creature's experience level >= 2 (the trigger will fire when the
                                            creature reaches experience level 2)
An Event trigger fires when a certain event happens. The kinds of event for which you can test depend on where the trigger hangs from. Possible triggers include:
When this level Pay Day (can hang from anywhere on the Script Tree)
When this player killed by Keeper 2 (must hang from a Keeper)
When this creature dying (must hang from a creature)
A Player trigger has to hang from a player. With a Player trigger you can test things such as:
When this player has more creatures than other player
When this player has more than 2 Rooms
When this player has killed more than 5 creatures belonging to the Good Player
Flags are like variables in programming, and they can be used in a number of ways. For example, you can hang the following script from a Creature:
Trigger: When this creature killed
    Action: Flag 1 = 1
When the creature is killed, Flag 1 will be set to the value 1. If you then create the following Flag trigger anywhere on the level, it will fire when the creature is killed:
When Flag 1 = 1
You can also use inequalities in Flag triggers, for example:
When Flag 3 >= 2
All Flags are set to 0 until they're set to another value, but you can't test the value of a Flag unless you have created an action on your Script Tree which sets the value of that Flag. This may seem annoying but it's actually very handy because it allows you to see which Flags have not yet been used. You can use up to 128 Flags in your level.
A Timer counts the seconds from when it was initialized, or switched on. For example you could hang this script off a creature:
Trigger: When this creature killed
    Action: Initialize Timer 1
And then hang this script off the level or off a player:
When Timer 1 >= 30
    Action: Make Keeper Spell Chicken available to Keeper 1
This will make the Chicken Spell available to the player 30 seconds after the death of the creature. Timers are a very helpful tool when balancing a level: by varying the length of time between events, the level flow can be altered. You can use up to 16 Timers.
Note that the Timer trigger tab won't appear in the Edit Trigger Properties dialog unless you have already initialized either a Timer or a Time Limit.
A GUI trigger hung from a Keeper allows you to detect:
An Action Point trigger (which must be hung from an Action Point) allows you to detect when:
Party triggers must be hung from a Hero Party. You can test:
Every action must be hung from a trigger, though more than one action can hang from the same trigger. When the trigger's conditions are met, the action will take place. Because of the hierarchy of the Script Tree, certain types of action may only be created on certain parts of the Script Tree.
Any item such as a Room or Keeper Spell may be made either available or unavailable to any Keeper. If it is made unavailable, it will disappear from their GUI.
This allows you to set the value of a Flag. By choosing either the Value or the Flag radio button, you can change a Flag in the following ways:
Note: Flag values wrap around from 0 to 255, so if you subtract 10 from 5 you'll get 250)
A Timer action allows you to initialize any of the 16 Timers, after which will start it counting seconds. Once you've initialized a Timer, you can test its value with a Timer trigger.
A Timer can be reinitialized, in which case it will start counting from 0 again. But you can never stop it once it's started.
At the bottom of the drop-down list of Timers you will see Time Limit. If you set a Time Limit, a countdown will be displayed on the screen during the game, starting at the value you enter in the Edit Action Properties dialog. The value of the Time Limit can be tested with a trigger.
Info Actions must be hung from a Keeper, and allow you to give the player information during the game. Most of these are specific to Campaign or My Pet Dungeon levels. Play Speech will play one of the 64 speech files which have been recorded for each level with which the game originally shipped.
An Info action will allow you to set the Widescreen mode on or off. This is used when camera control has been temporarily taken away from the player, so that they know what's going on.
The following Game actions may be hung from anywhere on the Script Tree except from Action Points:
These Game actions can be hung from any Keeper:
GUI actions must be hung from a Keeper. They allow you to flash a part of the GUI to draw the player's attention to an item, or to play a camera path.
Camera paths are usually used at the start of a level as part of the flyby introduction, or when a new creature enters the Dungeon. You need to enter the ID of an Action Point around which the camera path will be centred, and the index number of the camera path you want to play.
The easiest way to find out the index number of camera paths is to open a level in the DK2 Editor which features a camera path you want to use. Find the part of the script which triggers the camera path and note down the number of the camera path.
Note: if you have trouble finding the right bit of the script, right-click on the level name on the Script Tree, choose Find from the popup menu, type in camera path and click Find.
Action Point actions must be hung from a Keeper because they affect the specific player's view. With an Action Point action you can:
Party actions allow you to create a Hero Party at a specific Action Point. The box Invasion Party should only be checked if you are making a My Pet Dungeon level.
Map actions may be created anywhere on the Script Tree. For any Map action you will need to note down the co-ordinates of the tile which you want to change. To do this, move the mouse over the tile. The co-ordinates will be displayed in the Info Bar at the bottom of the screen. You can create the following Map actions:
Map actions should be used with caution since they may cause navigation or other problems with the game.
Firstly a creature can be created at any point on the map by right-clicking on any trigger on the Script Tree and choosing Add Creature Action from the popup menu. Then choose a player from the Script Tree, a creature type from the Object Selection Bar, and click on the map to place your creatures.
This kind of Creature action is quicker and easier than setting up a Hero Party and creating it at an Action Point. The disadvantages are that you can only create a single creature on a particular tile, and no Hero Gate entrance effect will be seen.
The following kinds of Creature action may be hung from any Keeper by choosing the Creature tab in the Edit Action Properties dialog.
From an individual creature you can create these kinds of Creature action:
The Configuration menu allows you to change the game itself. Rooms, Terrain, Creatures, Keeper Spells � you can control them all.
Note that some advanced options are not available is the standard DK2 Editor; to access them, you will have to use DK2 Editor Pro.
The Modify Terrain Properties dialog allows you to modify the properties of any Terrain type in the game. For example, you might want to change Impenetrable Rock so that it can be tagged and turns to Water once dug out.
The Health of a Terrain type indicates how much damage it would take to destroy it. If the Max Health is greater than the Starting Health, then Imps will be able to reinforce the Terrain.
The field Becomes type when at max health determines what Terrain it will become once reinforced, and the field Becomes type when destroyed determines what Terrain it will become when dug out. The Uses Effect field determines what visual effect will be displayed when these things happen. If the Impenetrable flag is checked then values cannot be entered into these fields.
The flag Taggable must be checked if you want the player to be able to tag the Terrain for digging.
The Gold Value field indicates how much gold (if any) is produced when the Terrain is dug out.
The flag Reveal Through Fog of War determines whether the Terrain is revealed when your creatures approach it.
Wibble is the distortion on tiles which prevents them from looking completely square.
The Placement flags determine where a player can build the room. For example, by default only bridges can be built on Water or Lava, but you could change this so that, for instance, Temple can be built on Lava.
Cost determines how much each tile of the room will cost to build.
Created Creature applies to Prisons and Graveyards and determines which creature is created by the room.
The Health value determines how long it will take an enemy Imp to claim the room.
Many of the fields in the Modify Creature Properties dialog are self-explanatory, but some of them are perhaps not immediately clear.
The Attributes list box allows you to change many aspects of a creature's behaviour, including its Fear which determines how easily it is frighted, its Threat which is how scary other creatures find it, and its Health which is how much damage it can take.
Note: the number of creatures in the Creature Pool cannot exceed the numbers you have set in the Modify Player Properties dialog.
The second Attraction may be a Room, Creature, amount of gold or Mana. The number entered is the minimum number of Room tiles (or whatever) required to attract the creature. For example, the Bile Demon is attracted by Workshop furniture, but the player must also have 25 tiles of Hatchery.
Gold cost is how much it costs the player to place the Door Blueprint.
Manf. to build determines how long it will take to build the Door.
Health determines how much damage must be done to destroy the Door.
Health determines how much damage must be done to destroy the Trap.
Mana usage determines how much Mana the Trap drains when it is scanning for enemies.
Mana cost to fire determines how much Mana it costs the player when the Trap fires.
Threat and Threat duration determine how scared creatures will be when they see the Trap.
Trigger Data determines how are close an enemy creature needs to be in order to trigger the Trap.
Manf. to build determines how long it will take to build the Trap.
There's not a lot you can usefully do with Objects, but I suppose you could set Chickens to be gold and Gold to be food. Try it and see.
Recharge time is the time which must elapse before the creature can cast its spell again.
Range is the distance over which the spell may be cast.
Cast Rule determines what kind of targets the spell may be cast on.
Mana Cost is the amount of Mana it costs to cast the spell.
Mana Drain is the rate at which the spell drains Mana after it has been cast.
Recharge Time determines the delay before the spell may be cast again.
Bonus Upgrade determines how long it will take to research the upgraded version of the spell.
Create Worker determines whether an Imp will be created when the spell is cast.
Shot Data usually determines the damage done by the spell, but may mean something different on certain spells, such as the duration of the spell's effect.
There are a lot of these. Some of them can usefully be varied but others should be left alone. Your best bet is to try changing a variable and then play the game and see whether it's achieved what you expected.
If the game crashes to Windows:
Version |
New Items |
| 1.51 | Elite Creatures |
| 1.6 | Maiden of the Nest |
| 1.7 | Hero Portal Jack in the Box Trap Mercenaries |
You are now ready to create levels for Dungeon Keeper 2 and distribute them to other players. The Dungeon Keeper 2 Level Designers and Testers have made a list of tips which you may find helpful:
| Term | Description |
| Action Point | A rectangular area of the map, defined by the level designer using the DK2 Editor |
| Attraction | Item which attracts a Creature into a Keeper's Dungeon |
| Bile Demon | Bile Demon, a fat evil creature spiece |
| Blueprint | Blueprint is the half-transparent image of object |
| Campaign | The single player campaign game |
| Chicken | Yellow chicken, usually produced in hatchery |
| Chicken Spell | The Keeper Spell which turns enemies into chickens |
| Computer Player | Player controlled by computer AI |
| Claimed Path | Land which is owned by any player |
| Creature | A creature |
| Creature Panel | The creature panel in the game |
| Creature Spells | Spells which may be cast by creatures |
| Debriefing Screen | The debriefing screen which appears at the end of a level |
| DK2 Editor | The Editor which allows you to create your own levels for Dungeon Keeper 2 |
| DK2 Editor Pro | A version of DK2 Editor which was modified by fans. It has more options than standard editor. |
| Door | A door which can be placed to restrict access of creatures to areas of map |
| Dungeon Heart | Dungeon Heart: the focus of any Keeper's power: if this room is destroyed they will lose the game. |
| Dwarf | A dwarf, good creature spiece |
| Electric Chair | Electric Chair, equipment of the Torture Chamber |
| Elite | An elite creature, the champion of its kind |
| Experience Level | Experience Level of a creature |
| Event trigger | A trigger which fires when a certain event takes place |
| Fairy | A fairy, good creature spiece |
| Follower | A Hero who is part of a group and follows the leader |
| Good Player | The Good Player owns all the Heroes in a level |
| Graveyard | Graveyard, the room |
| GUI | The graphical user interface, such as the Creature Panel and the minimap |
| Hatchery | Hatchery, the room |
| Health Flower | The health flower above a creature's head which shows its health and moods |
| Hero | A Hero, a do-gooder intent on driving evil from the land |
| Hero Claimed Path | Terrain owned by the Heroes |
| Hero Gate | A Hero Gate, the magical gateway by which Heroes enter the underworld |
| Hero Lair | Hero Lair, a room where Heroes can retreat to heal from their wounds |
| Hero Party | A group of Heroes with a common purpose, defined by the level designer using the DK2 Editor |
| Hero Portal | The gateway by which Mercenary Heroes can be enticed to enter your Dungeon - added to the game as part of Update 1.7. |
| Hero Tool Box | Hero Tool Box, a special area of a My Pet Dungeon level containing Heroes which the player can pick up and drop anywhere. |
| Horny | The Horned Reaper, evil creature |
| Impenetrable Rock | Impenetrable rock - solid rock which cannot be dug out |
| Imp | An Imp, magical being which can dig earth and do other jobs. |
| Info Bar | The information bar at the bottom of the DK2 Editor screen. Displays information about the terrain which the mouse is over, and the item currently selected. |
| Keeper | A Keeper, the sinister intelligence controlling a Dungeon full of evil creatures |
| Keeper Spell | A spell which can be cast by a Keeper |
| Lair | Lair, the room |
| Lava | Lava, the hot liquid |
| Leader | The leader of a group of Heroes: they will follow him |
| Lord of the Land | The Lord of the Land, the noble Hero who is the ruler of his overland realm |
| Main Screen | The main screen which you see when using the DK2 Editor |
| Mana | Mana, the force generated by claimed land which powers Keeper Spells, Traps and Imps. |
| Melee attack | A creature's close-quarters attack |
| Mercenary | A mercenary Hero who is prepared to join the forces of evil - at a price. Added to the game as part of Update 1.7. |
| Multiplayer | Multiplayer game mode |
| My Pet Dungeon | My Pet Dungeon game mode |
| Neutral Player | The neutral player. Present on the Script Tree to own neutral creatures, objects and land. |
| Object Selection Bar | The panel at the bottom of the Main Screen of the DK2 Editor which allows you to choose creature, rooms etc. to place on the map |
| Objective tab | The pointer which appears on the screen during the game to point to the player's objective |
| Player trigger | A trigger which tests the properties of an individual player: for example, how many creatures they have or how much gold. |
| Portal | Portal, the magical gateway through which new recruits enter your realm |
| Portal Gem | Portal Gem, one of the keys to unlock the gate to the sunlit realms of the Heroes |
| Prison | Prison, the room |
| Reinforced Wall | Reinforced wall, rock which has been strengthened to resist attackers. |
| Room | Room of any type |
| Salamander | A Salamander, evil creature spiece |
| Script Tree | The hierarchical display of the level's script, including all players, creatures, triggers and actions which exist in the level. |
| Secret Door | A Secret Door, kind of the door |
| Singleplayer | Singleplayer game mode |
| Skeleton | A Skeleton |
| Skirmish | Skirmish game mode |
| Stone Bridge | Stone Bridge, a room kind |
| Temple | Temple, room lind |
| Torture Chamber | Torture Chamber, the room |
| Terrain type | Terrain type |
| Total Evil Rating | Total Evil Rating, the parameter displayed in debriefing |
| Trap | Trap which can be used to injure enemy creatures |
| Update 1.7 | Update 1.7, a free update to DK2 available on the Internet. |
| Vampire | A Vampire, evil creature kind |
| Wizard | A Wizard, good creature kind |
| Wooden Bridge | Wooden Bridge, the room kind |
| Workshop | Workshop, the room kind |